The ticket layout is a regular Smarty template with some customization options. If you want to change the appearance and text of the tickets, you can simply copy the corresponding template to your template folder and modify it there.
Override Ticket Template
To customize the template, log in to your FTP account. Navigate to the plugin directory /custom/plugins/FgitsTickets/Resources/views/pdf (For version < 2.0: /engine/Shopware/Plugins/Community/frontend/FgitsTickets) and copy the file ticket.tpl located there to the folder /themes/Frontend/{Your-Template}/pdf. You can now customize the copied file according to your wishes in an editor.
If you make changes to the ticket.tpl directly in the plugin directory, these may be overwritten when the plugin is updated!
After all changes to the ticket templates, you must clear the cache.
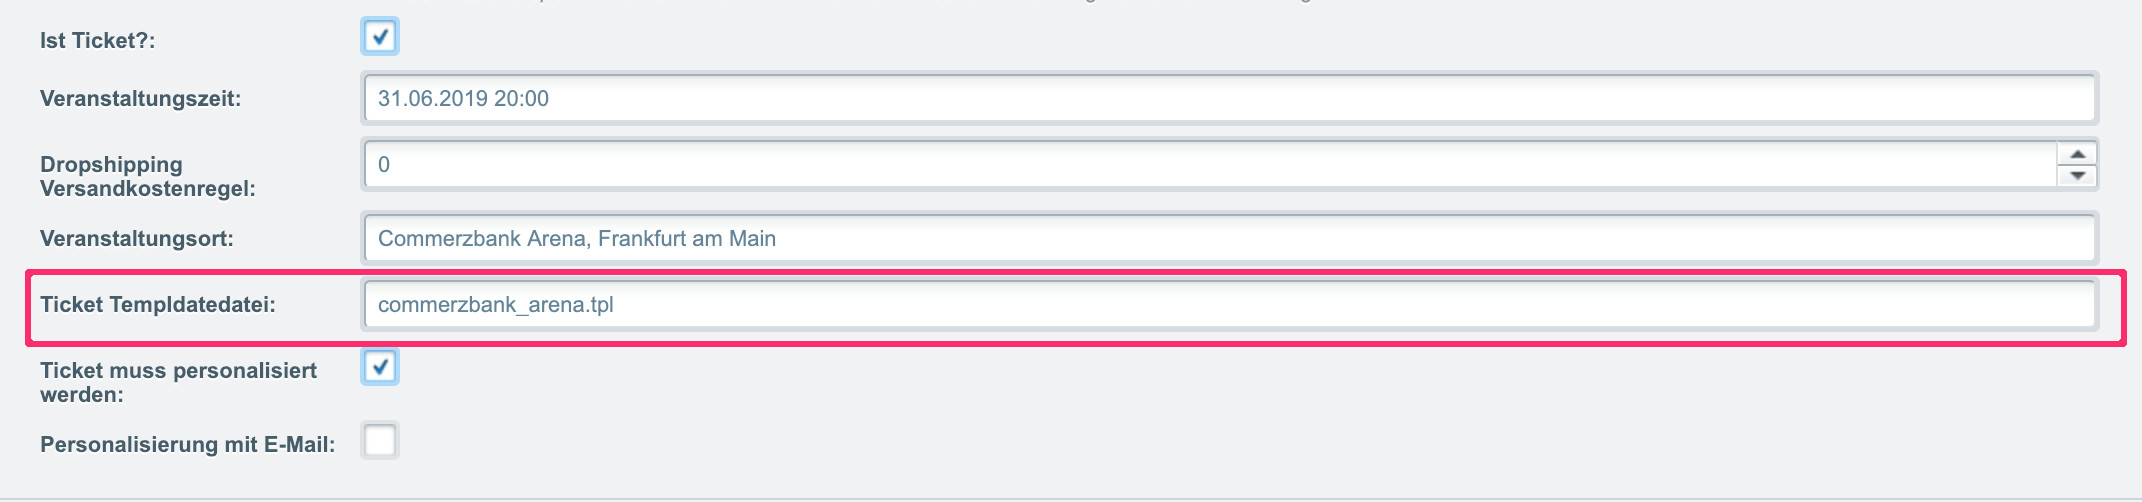
Also, in your Shopware backend under Products→Overview→Name of Your Product, as indicated below, enter the name of your ticket under "Ticket Template File".
Variables
Various variables are available in the ticket template:
| Variable Names | Description |
|---|---|
| {$ticketName} | Name of the ticket (product name, variant name) |
| {$articleNumber} | Article number of the ticket product |
| {$orderNumber} | Order number of the order |
| {$price} | Price of the respective ticket product |
| {$eventDatetime} | Event date & time |
| {$eventLocation} | Event location |
| {$order} | Order details, you can view contents with {$order|var_dump}. |
| {$articleDetail} | Product details, you can view contents with {$articleDetail|var_dump}. |
| {$ticketId} | The ticket ID from the barcode |
| {$ticketHash} | Ticket hash, which is also used in the URL |
| {$config} | Plugin configuration |
| {$ticketTemplate} | Filename of the ticket template |
| {$personalizedFullname} | First and last name of the ticket buyer |
{$order.billing.firstName}, {$order.billing.lastName} | First name of the ticket buyer, Last name of the ticket buyer |
Under the variable {$articleDetail.article} all possible product data is available. Under {$articleDetail.article.attribute.attr1} you can, for example, access attribute 1 of the ticket.
From v2.5.2 you can access product images via {$articleDetail.article.images}. For example, here's how you could access the main image of the product from the template:
{foreach $articleDetail.article.images as $image}
    {if $image.main == 1}
        {$image.media.path}
    {/if}
{/foreach}
We are happy to provide you with additional variables as a custom service. Simply contact us directly!
Barcode / QR Code
If you need a different type of barcode, you can simply modify the barcode tag in the ticket template accordingly.
The following barcode types are currently available:
'EAN13','ISBN','ISSN','UPCA','UPCE','EAN8''EAN13P2','ISBNP2','ISSNP2','UPCAP2','UPCEP2','EAN8P2'(with EAN-2 supplement code i.e. 01-99 )'EAN13P5','ISBNP5','ISSNP5','UPCAP5','UPCEP5','EAN8P5'(with EAN-5 supplement code e.g. 90000 )
('UPCE'needs the UPCA $code entered)'IMB','RM4SCC','KIX','POSTNET','PLANET''C128A','C128B','C128C''EAN128A','EAN128B','EAN128C''C39','C39+','C39E','C39E+''S25','S25+','I25','I25+','I25B','I25B+''C93''MSI','MSI+''CODABAR''CODE11'
Source: https://mpdf.github.io/reference/html-control-tags/barcode.html (as of 24.09.2018)
Some of the above barcode types may not support letters and are therefore not suitable for display. We recommend using a QR code!
Test Your Ticket
By ordering your ticket through the shop frontend and opening the ticket link in your email, you can view your ticket. For any further changes to the ticket, you simply need to clear the caches and reload the opened ticket.
Related Articles
Related articles appear here based on the keywords you select. Click to edit the macro and add or change keywords.
| Related Tasks |
|---|